Lead Import
The Lead Import feature allows you to bulk upload leads from CSV files, making it easy to bring existing contact lists into kenbun. The import wizard guides you through mapping your CSV columns to kenbun fields and handles deduplication automatically.
Understanding Lead Import
Lead import is useful when you need to:
- Migrate contacts from another system into kenbun
- Upload lead lists from trade shows or events
- Bulk create leads with profile information
- Add multiple identifiers (email, phone, cookies) to existing leads
The import wizard uses a five-step process that validates your data, maps fields, and imports leads in the background.
Import Process Overview
- Upload: Upload a CSV file with lead data
- Select Identifier: Choose which column uniquely identifies each lead
- Map Fields: Map CSV columns to profile fields or additional identifiers
- Confirm: Review your settings before starting the import
- Results: View import progress and any errors
Step-by-Step Instructions
Step 1: Upload CSV File
- Navigate to Leads in the main menu
- Click Import Leads
- Drag and drop your CSV file or click to browse
- The file must have a header row with column names
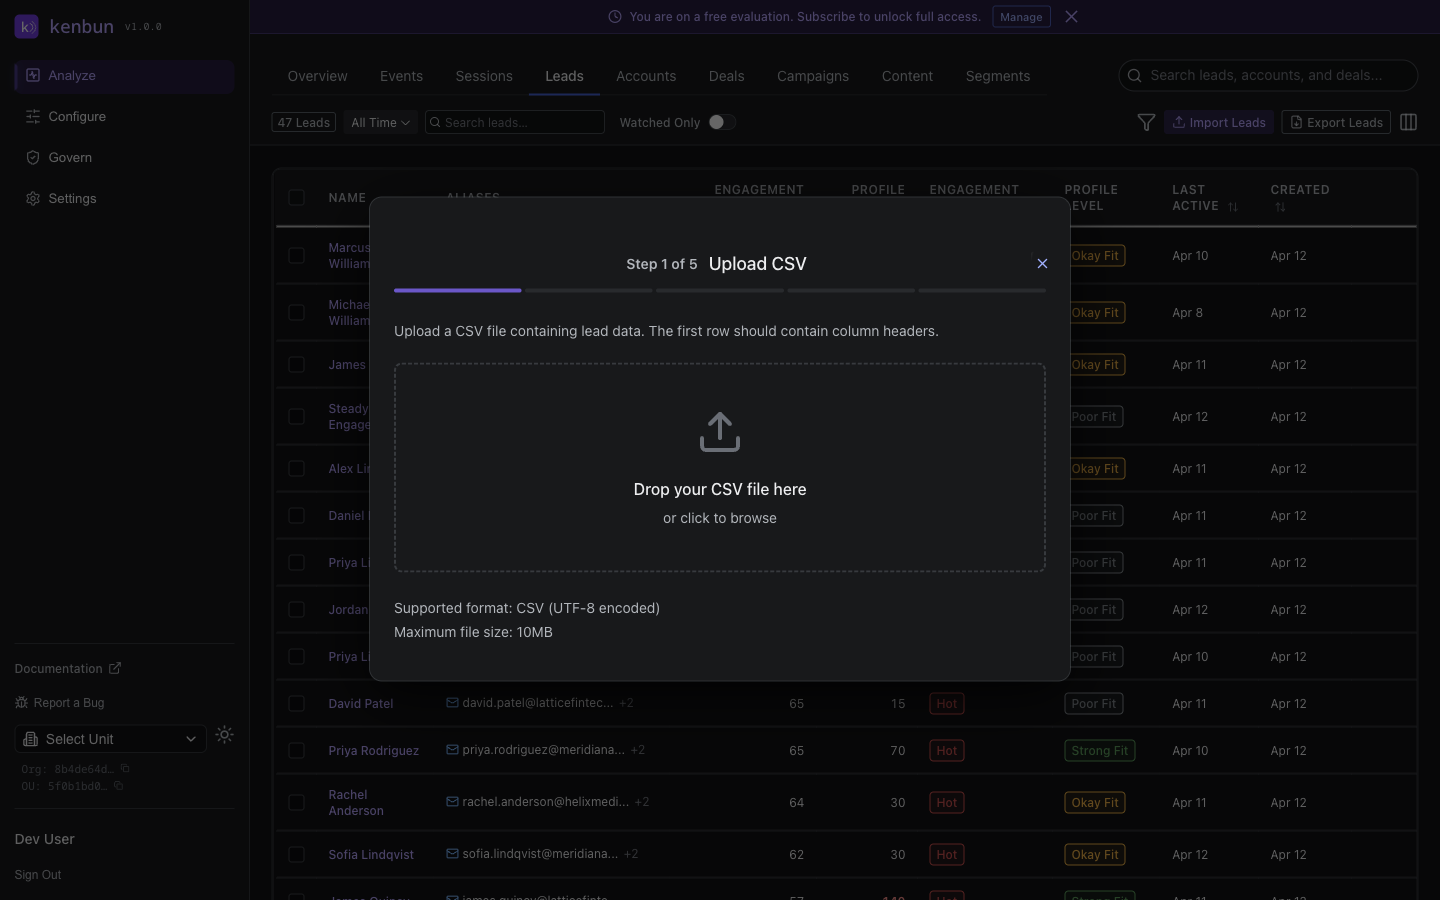
Supported File Format:
- CSV files only
- Must include header row
- Maximum file size: 10 MB
- UTF-8 encoding recommended
Step 2: Select Primary Identifier
Choose which column contains the primary identifier for each lead:
Identifier Types:
- Email: Email address (most common)
- Phone: Phone number
- Cookie ID: Browser cookie identifier
- External ID: Your system's unique identifier
- Social: Social media handle
The import wizard will auto-detect columns that look like email addresses or phone numbers to help you select the right identifier.
Step 3: Map CSV Columns
Map each CSV column to either:
Profile Fields: Standard lead attributes like name, company, industry, etc.
first_namelast_namecompanytitleindustrycountry- Any custom profile fields you've defined
Additional Aliases: Extra identifiers for the same lead
_alias_email- Additional email address_alias_phone- Additional phone number_alias_cookie- Additional cookie ID_alias_external_id- Additional external ID_alias_social- Additional social handle
Skip: Columns you don't want to import
Example Mapping:
CSV Column          → kenbun Field
Email Address       → Primary Identifier (email)
Full Name           → first_name
Company Name        → company
Job Title           → title
Work Phone          → _alias_phone
LinkedIn Profile    → _alias_social
Step 4: Confirm and Start Import
Review your settings:
- File name and row count
- Primary identifier type and column
- Field mappings summary
Click Start Import to begin the background import job.
Step 5: Monitor Import Progress
The import runs in the background. You can:
- View progress in real-time
- See how many leads were created vs. updated
- Review error details for any failed rows
- Download an error report if needed
Import Behavior
Deduplication
kenbun automatically prevents duplicate leads:
- Matching Logic: If a lead with the same identifier already exists, kenbun updates that lead instead of creating a duplicate
- Identifier Matching: Uses the primary identifier column you selected
- Profile Updates: Existing profile fields are updated with new values from the CSV
- Alias Addition: Additional aliases are added to existing leads
Field Mapping Rules
- Required Fields: Only the primary identifier is required
- Empty Values: Empty CSV cells are skipped (won't overwrite existing data)
- Case Sensitivity: Column names are case-insensitive
- Data Types: All profile fields are stored as strings
Error Handling
Common import errors and solutions:
| Error | Cause | Solution |
|---|---|---|
| Missing identifier | Row has empty value in identifier column | Ensure all rows have an identifier value |
| Invalid email format | Email doesn't match email pattern | Fix email format (must contain @) |
| Row processing failed | Server error or validation failure | Check error details in import job results |
Viewing Import History
Access your import history:
- Navigate to Leads
- Click Import Leads
- View Recent Imports section
For each import job, you can see:
- Import date and time
- File name
- Status (in progress, completed, failed)
- Results summary (created, updated, failed)
- Error details
Best Practices
Preparing Your CSV
- Clean Your Data: Remove duplicate rows before uploading
- Consistent Formatting: Use consistent formats for emails, phone numbers
- Header Row: Ensure the first row contains clear column names
- UTF-8 Encoding: Save your CSV with UTF-8 encoding to preserve special characters
- Test Small First: Try importing 10-20 rows first to verify your mapping
Field Mapping Strategy
- Map Only What You Need: Skip columns that aren't useful in kenbun
- Use Standard Fields: Map to standard profile fields when possible
- Additional Identifiers: Add phone and external IDs as aliases for better matching
- Custom Properties: You can map to custom profile fields you've created
Performance Tips
- Large Imports: For files with >10,000 rows, consider splitting into smaller batches
- Off-Peak Hours: Run large imports during off-peak times for better performance
- Monitor Progress: Check import job status to catch errors early
API Access
You can also import leads programmatically using the API:
Preview Import
POST /leads/import/preview
Upload a CSV file to preview headers and sample rows.
curl -X POST "https://api.kenbun.io/leads/import/preview" \
  -H "Authorization: Basic <credentials>" \
  -F "file=@leads.csv"
Start Import
POST /leads/import/start
Start an import job with field mappings.
curl -X POST "https://api.kenbun.io/leads/import/start" \
  -H "Authorization: Basic <credentials>" \
  -H "Content-Type: application/json" \
  -d '{
    "file_id": "preview_abc123",
    "primary_identifier": {
      "column": "Email",
      "kind": "email"
    },
    "field_mappings": {
      "Full Name": "first_name",
      "Company": "company"
    },
    "alias_mappings": {
      "Phone": "_alias_phone"
    }
  }'
List Import Jobs
GET /leads/import/jobs
Get a list of all import jobs.
curl -X GET "https://api.kenbun.io/leads/import/jobs" \
  -H "Authorization: Basic <credentials>"
Get Import Job Details
GET /leads/import/jobs/{jobId}
Get detailed results for a specific import job.
curl -X GET "https://api.kenbun.io/leads/import/jobs/job_123" \
  -H "Authorization: Basic <credentials>"
Response Example:
{
  "job_id": "job_123",
  "status": "completed",
  "created_at": "2025-01-15T10:00:00Z",
  "completed_at": "2025-01-15T10:05:00Z",
  "file_name": "leads.csv",
  "total_rows": 1000,
  "created_count": 750,
  "updated_count": 230,
  "failed_count": 20,
  "errors": [
    {
      "row": 45,
      "error": "Invalid email format"
    }
  ]
}
Troubleshooting
Import Not Starting
- Verify CSV file has a header row
- Check file size is under 10 MB
- Ensure you selected a primary identifier
- Confirm you have an active Organizational Unit selected
All Rows Failing
- Check that the identifier column values are valid
- Verify column mappings are correct
- Ensure profile field names match exactly (case-insensitive)
- Review the first error message for clues
Some Rows Failing
- Download the error report to see which rows failed
- Common issues: empty identifiers, invalid formats, special characters
- Fix the problematic rows and re-import just those rows
Import Taking Too Long
- Large files (10,000+ rows) can take several minutes
- The import runs in the background - you can navigate away
- Check the import jobs list to monitor progress
- Consider splitting very large files into smaller batches
Related Features
- Lead Management: View and manage imported leads in the Leads page
- Profile Mappings: Configure custom profile fields for import
- API Integration: Use the API for automated imports
- Segments: Create segments to organize imported leads